###KickStart [Unattended Installation]###
Kickstart helps to install system unattended. It uses kickstart configuration file and dhcp service for this.
In windows systems kickstart file is known as answer file.
###These are the steps happening.###
Server[dhcp+ks] client
1. asks IP and location of kickstart file
2.gives the info
3. Takes the ks.cfg file and mounts share of OS
###dhcp [nfs/ftp/http] + ks.cfg [nfs]###
The dhcp is using for getting IP for the client machine at first for instation and to get the location of Ks.cfg file. The remote installation image can be of NFS,HTTP or FTP. The kickstar file will be shared using NFS.
###KickStart Configuration###
package = system-config-kickstart
#yum -y install system-config-kickstart
#system-config-kickstart
Basic configuration
Default Language = English USA
Keyboard = U S English
Time Zone = Asia/Culcutta
Root Password = redhat
Confirm Password = redhat
check the encryption box
Target Architecture = x86,AMD64 or Intel EM64T
Check the reboot checkbox
Installation Method
Installaton method = Perform new installation
Choose the Installation Method = NFS //You can use HTTP or FTP if you want
NFS server = IP of the machine which contains NFS image of DVD
NFS directory = Path of NFS share
Boot Loader options
Install New Boot Loader
Use GRUB password if required
Install boot loader on MBR
Partition Information
Do not clear MBR
Remove all exisiting partitions //Removing linux partitions only wont work all time. Windows partitions will be deleted.
click add button and configure as required
Network Configuration
Click Add Network Devices button
Select the network device which is connected to ur machine
network type = DHCP or STATIC [manual]
Authentication
Authentication Configuration
check use shadow passwords
check use MD5
Firewall Configuration
Firewall Configuration
Security level = Disable firewall
SELinux = Disabled
Display Configuration
Check Configure the x-window system
In General Tab
Color Depth Resolution
8 1024*768 //Default 640*480 will give a blurred image
Default Desktop
Check Gnome
Check Start X window system on Boot
package selection
Nothing to do //We will add package lines
Pre-Installation Script
Add if wanted
Post-Installation Script
Add if wanted
Configuration over. Save the file. Open the file for further editing.
#vi ks.cfg
Add these lines - Otherwise it wont work.
key --skip
%packages
And these lines for Graphics
@admin-tools
@base
@base-x
@core
@dialup
@editors
@games
@gnome-desktop
@graphical-internet
@graphics
@java
@office
@printing
@sound-and-video
@text-internet
###Make it as NFS share###
copy the ks.cfg file to some dir and share it via NFS
#mkdir /kick
#cp ks.cfg /kick/
#vi /etc/exports
/kick *()
#exportfs -a
###DHCP Configuration###
Add these lines to DHCP Configuration file
#vi /etc/dhcpd.conf
filename "/kick/ks.cfg";
next-server 192.168.1.11; // [ip of the machine which contains kickstart file(ks.cfg)]
#service dhcpd restart
#service nfs restart
###Installation###
#Boot: linux ks
Have a break. The system will be ready when you get back!
Monday, December 20, 2010
Samba PDC domain controller on RedHat /Cent OS
Samba PDC is used for centralized authentication and domain control of Windows
operating systems.
Here we will set a samba PDC machine with domain name lap.work and create some
users. And we will check whether these users are able to login to this domain from different
machines.
In this example we are working on rhel5. It will also work on other distributions like RedHat, Centos, Fedora, etc.
Samba PDC Machine:
rhel 5.4
IP : 192.168.0.1
Windows Client:
Windows XP Professional SP2
Computer Name : lap-xp
Domain Name : lap.work
IP : 192.168.0.2
Installation:
Install samba packages:
[root@sambapdc ~]# yum install samba*
Configuration:
open the samba configuration file and make the following edits.
[root@sambapdc ~]# vim /etc/samba/smb.conf
Uncomment or edit the lines as shown below.
In global settings:
workgroup = lap.work #domain name
server string = Samba PDC Server #as host name. just to identify
netbios name = samba #netbios name for communication
local master = yes
preferred master = yes
domain master = yes
domain logons = yes
logon path = \\%L\Profiles\%U #profile entry
security = user
passdb backend = tdbsam
In share definishions:
[homes]
browseable = yes
writable = yes
[netlogon]
path = /home/netlogon
writable = no
[Profiles]
path = /home/profiles
create mask = 0755
directory mask = 0755
writable = yes #should give. Else you will get ACCESS DENIED errors
Now create the following directories:
[root@sambapdc ~]# mkdir -m 1777 /home/profiles
[root@sambapdc ~]# mkdir -m 1777 /home/netlogon
Attaching a windows machine:
Now create a group named machine and add a user with the name of windows client
[root@sambapdc ~]# groupadd -g 200 machine
[root@sambapdc ~]# useradd -d /dev/null -g 200 -s /sbin/nologin lap-xp$
Where lap-xp is the name of the machine we are attaching to samba PDC
[root@sambapdc ~]# smbpasswd -m -a lap-xp
Start the samba service:
[root@sambapdc ~]# service smb start
[root@sambapdc ~]# chkconfig smb on
Run testparm and test your configuration settings:
[root@sambapdc ~]# testparm
[root@sambapdc ~]# smbpasswd -a root
[root@sambapdc ~]# smbpasswd -e root
Add two more users for testing:
#useradd user1
#smbpasswd -a user1
#smbpasswd -e user
#useradd user2
#smbpasswd -a user2
#smbpasswd -e user2
[root@sambapdc ~]# service smb restart
On windows machine:
Right click the My Computer icon
Take properties
Take Computer name tab
Add the system to lap.work domain
you will be prompted for a username and password. Give root and its password.
System may need to restart
you can see that when we are logged as user1 a directory user1 will be created in /home/profiles
in samba PDC machine. This will be the home directory of that user. He will he able to login
from all machines in this domain and will be getting to this same directory.
:)
RedHat /Cent OS/ Fedora/ Ubuntu TOP command
TOP
Top command provides a real-time look at what is happening with your system. Top produces so much output that a new user may get over whelmed with all thats presented and what it means.
Lets take a look at TOP one line at a time. The server has been flooded with http requests to create some load on the server.
top output:
top - 22:09:08 up 14 min,  1 user,  load average: 0.21, 0.23, 0.30
Tasks:  81 total,   1 running,  80 sleeping,   0 stopped,   0 zombie
Cpu(s):  9.5%us, 31.2%sy,  0.0%ni, 27.0%id,  7.6%wa,  1.0%hi, 23.7%si,  0.0%st
Mem:    255592k total,   167568k used,    88024k free,    25068k buffers
Swap:   524280k total,        0k used,   524280k free,    85724k cached

  PID USER      PR  NI  VIRT  RES  SHR S %CPU %MEM    TIME+  COMMAND
 3166 apache    15   0 29444 6112 1524 S  6.6  2.4   0:00.79 httpd
 3161 apache    15   0 29444 6112 1524 S  5.9  2.4   0:00.79 httpd
 3164 apache    15   0 29444 6112 1524 S  5.9  2.4   0:00.75 httpd
 3169 apache    15   0 29444 6112 1524 S  5.9  2.4   0:00.74 httpd
 3163 apache    15   0 29444 6112 1524 S  5.6  2.4   0:00.76 httpd
 3165 apache    15   0 29444 6112 1524 S  5.6  2.4   0:00.77 httpd
 3167 apache    15   0 29444 6112 1524 S  5.3  2.4   0:00.73 httpd
 3162 apache    15   0 29444 6112 1524 S  5.0  2.4   0:00.77 httpd
 3407 root      16   0  2188 1012  816 R  1.7  0.4   0:00.51 top
  240 root      15   0     0    0    0 S  0.3  0.0   0:00.08 pdflush
  501 root      10  -5     0    0    0 S  0.3  0.0   0:01.20 kjournald
 2794 root      18   0 12720 1268  560 S  0.3  0.5   0:00.73 pcscd
    1 root      15   0  2060  636  544 S  0.0  0.2   0:03.81 init
    2 root      RT  -5     0    0    0 S  0.0  0.0   0:00.00 migration/0
    3 root      34  19     0    0    0 S  0.0  0.0   0:00.00 ksoftirqd/0
    4 root      RT  -5     0    0    0 S  0.0  0.0   0:00.00 watchdog/0
    5 root      10  -5     0    0    0 S  0.0  0.0   0:00.07 events/0
The first line in top:
top - 22:09:08 up 14 min, 1 user, load average: 0.21, 0.23, 0.30
“22:09:08″ is the current time; “up 14 min” shows how long the system has been up for; “1 user” how many users are logged in; “load average: 0.21, 0.23, 0.30″ the load average of the system (1minute, 5 minutes, 15 minutes).
Load average is an extensive topic and to understand its inner workings can be daunting. The simplest of definitions states that load average is the cpu utilization over a period of time. A load average of 1 means your cpu is being fully utilized and processes are not having to wait to use a CPU. A load average above 1 indicates that processes need to wait and your system will be less responsive. If your load average is consistently above 3 and your system is running slow you may want to upgrade to more CPU’s or a faster CPU.
The second line in top:
Tasks: 82 total, 1 running, 81 sleeping, 0 stopped, 0 zombie
Shows the number of processes and their current state.
The third lin in top:
Cpu(s): 9.5%us, 31.2%sy, 0.0%ni, 27.0%id, 7.6%wa, 1.0%hi, 23.7%si, 0.0%st
Shows CPU utilization details. “9.5%us” user processes are using 9.5%; “31.2%sy” system processes are using 31.2%; “27.0%id” percentage of available cpu; “7.6%wa” time CPU is waiting for IO.
When first analyzing the Cpu(s) line in top look at the %id to see how much cpu is available. If %id is low then focus on %us, %sy, and %wa to determine what is using the CPU.
The fourth and fifth lines in top:
Mem:    255592k total,   167568k used,    88024k free,    25068k buffers
Swap:   524280k total,        0k used,   524280k free,    85724k cached
Describes the memory usage. These numbers can be misleading. “255592k total” is total memory in the system; “167568K used” is the part of the RAM that currently contains information; “88024k free” is the part of RAM that contains no information; “25068K buffers and 85724k cached” is the buffered and cached data for IO.
So what is the actual amount of free RAM available for programs to use ?
The answer is: free + (buffers + cached)
88024k + (25068k + 85724k) = 198816k
How much RAM is being used by progams ?
The answer is: used – (buffers + cached)
167568k – (25068k + 85724k) = 56776k
The processes information:
Top will display the process using the most CPU usage in descending order. Lets describe each column that represents a process.
 PID USER      PR  NI  VIRT  RES  SHR S %CPU %MEM    TIME+  COMMAND
3166 apache    15   0 29444 6112 1524 S  6.6  2.4   0:00.79 httpd
PID – process ID of the process
USER – User who is running the process
PR – The priority of the process
NI – Nice value of the process (higher value indicates lower priority)
VIRT – The total amount of virtual memory used
RES – Resident task size
SHR – Amount of shared memory used
S – State of the task. Values are S (sleeping), D (uninterruptible sleep), R (running), Z(zombies), or T (stopped or traced)
%CPU – Percentage of CPU used
%MEM – Percentage of Memory used
TIME+ – Total CPU time used
COMMAND – Command issued
Interacting with TOP
Now that we are able to understand the output from TOP lets learn how to change the way the output is displayed.
Just press the following key while running top and the output will be sorted in real time.
M – Sort by memory usage
P – Sort by CPU usage
T – Sort by cumulative time
z – Color display
k – Kill a process
q – quit
If we want to kill the process with PID 3161, then press “k” and a prompt will ask you for the PID number, and enter 3161.
Command Line Parameters with TOP
You can control what top displays by issuing parameters when you run top.
- d – Controls the delay between refreshes
- p – Specify the process by PID that you want to monitor
-n – Update the display this number of times and then exit
If we want to only monitor the http process with a PID of 3166
$ top -p 3166
If we want to change the delay between refreshes to 5 seconds
$ top -d 5
Thursday, December 9, 2010
Howto Convert Ext3 filesystem to Ext4 Filesystem without Reinstalling OS in Fedora/CentOS/Ubuntu
Things to remember
First, unmount the partition: umount /dev/sda2 (change sda2 with your Drive)
Next, run a filesystem check on it to make sure it is in sane condition.
- Unmount the filesystem before convert
- Filesystem must be non-root
First, unmount the partition: umount /dev/sda2 (change sda2 with your Drive)
Next, run a filesystem check on it to make sure it is in sane condition.
fsck.ext3 -pf /dev/sda2Enable new features of ext4 on the filesystem
tune2fs -O extents,uninit_bg,dir_index /dev/sda2Run a filesystem check. to make sure that the filesystem is now clean.
fsck -pf /dev/sda2Now edit your /etc/fstab file and replace "ext3" with "ext4" for /dev/sda1. Other options may differ for your system.
/dev/sda2 /disk ext4 defaults 0 2Try to mount your new ext4 filesystem: mount /disk
Sunday, December 5, 2010
Create your own Forums on Cent OS AMIs
[ec2-user@ip-10-112-7-1 ~]$ sudo yum install mysql mysql-server httpd php php-mysql php-gd php-imap php-ldap php-odbc php-pear php-xml php-xmlrpc phpmyadmin
[ec2-user@ip-10-112-7-1 ~]$ sudo service httpd restart
Stopping httpd: [FAILED]
Starting httpd: [ OK ]
[ec2-user@ip-10-112-7-1 ~]$ sudo service mysqld restart
Stopping mysqld: [ OK ]
Initializing MySQL database: Installing MySQL system tables...
OK
Filling help tables...
OK
To start mysqld at boot time you have to copy
support-files/mysql.server to the right place for your system
PLEASE REMEMBER TO SET A PASSWORD FOR THE MySQL root USER !
To do so, start the server, then issue the following commands:
/usr/bin/mysqladmin -u root password 'new-password'
/usr/bin/mysqladmin -u root -h ip-10-112-7-1 password 'new-password'
Alternatively you can run:
/usr/bin/mysql_secure_installation
which will also give you the option of removing the test
databases and anonymous user created by default. This is
strongly recommended for production servers.
See the manual for more instructions.
You can start the MySQL daemon with:
cd /usr ; /usr/bin/mysqld_safe &
You can test the MySQL daemon with mysql-test-run.pl
cd /usr/mysql-test ; perl mysql-test-run.pl
Please report any problems with the /usr/bin/mysqlbug script!
[ OK ]
Starting mysqld: [ OK ]
[ec2-user@ip-10-112-7-1 ~]$ wget http://vanillaforums.org/uploads/addons/LABOJ70HFYO0.zip
--2010-12-06 05:41:39-- http://vanillaforums.org/uploads/addons/LABOJ70HFYO0.zip
Resolving vanillaforums.org... 67.23.13.227
Connecting to vanillaforums.org|67.23.13.227|:80... connected.
HTTP request sent, awaiting response... 200 OK
Length: 2977490 (2.8M) [application/zip]
Saving to: “LABOJ70HFYO0.zip”
100%[======================================>] 2,977,490 3.36M/s in 0.8s
2010-12-06 05:41:40 (3.36 MB/s) - “LABOJ70HFYO0.zip” saved [2977490/2977490]
[ec2-user@ip-10-112-7-1 ~]$ unzip LABOJ70HFYO0.zip -d /var/www/html


Thursday, December 2, 2010
Backup and Restore a Subversion Repository
First, here's how back up the repository to a compressed file:
$ svnadmin dump /path/to/repo | gzip > backup.gzAnd how to restore it:
$ gunzip -c backup.gz | svnadmin load /path/to/repo
Those commands are meant for UNIX or Linux so you will have to adapt
them if you are running Windows. It shouldn't be too difficult to do so,
 especially if you are using Cygwin.
Wednesday, December 1, 2010
What is the difference between Hard Link and Soft Link in Linux
Hard link: Hard link refers to "The specific location of physical data".
- Hard Link is a mirror copy of the original file.
- Hard links share the same inode.
- Any changes made to the original or Hard linked file will reflect the other.
- Even if you delete any one of the files, nothing will happen to the other hard links.
- But soft link which points to deleted hard link become a dangling soft link.
- You can't link a directory even within the same file system.
- Hard links can't cross file systems.
- Soft Link is a symbolic link to the original file.(more like windows shortcuts)
- Soft Links will have a different Inode value.
- Any changes made to the soft link will reflect the original file and its hard links.
- A soft link points to the original file. If you delete the original file, the soft link fails. It would become dangling symbolic link.
- If you delete the soft link, nothing will happen.
- You can link a directory using soft link on same file system and also on other file system.
- Soft links can cross file systems
Hindi FM Live Radio Internet Streaming Online
More List of Hindi Internet Radio Stations Online
- Humsafar Radio
- Planet Radio City
- Sunrise Radio
- Akash Radio
- Taal FM
- Internet Radio India
- City 101.6 FM Dubai
- Desi Soundz Radio
- Bollywood Hungama
- Radio Maska
- Mastradio FM
- Afsana FM
- Radio Nimbooda
- Radio Mirchi 98.3 FM
- Craze FM
- Apna Radio
- Radio Tarana
- Teentaal
- Punjabi FM
- Bollywood Music Radio
- Sada Radio
- Makeni Broadcasting Online
- GuyanaNJ FM
- FM 100 Lahore
- Punjab Live Radio
- Desi Radio
- Radio NRI
- Bombay Beats FM
Bare Metal Recovery Solution Mondo Backup
Here's an interesting alternative to using CloneZilla and the likes for Bare Metal Recovery:
Mondo Rescue is a free (GPL) powerful disaster recovery suite for Linux (i386, x86_64, ia64) and FreeBSD (i386). It's packaged for multiple distributions (RedHat, RHEL, SuSE, SLES, Mandriva, Debian, Gentoo). It's basically the Linux equivalent of the powerful AIX mkcd / mkdvd.
It supports backups to tapes, disks, network and CD/DVD. It also supports multiple filesystems (ext2, ext3, JFS, XFS, ResierFS, VFAT and even NTFS), LVM, software and hardware Raid.
Example of using Mondo Rescue:
Generate a bootable DVD that also backs up /etc and can recover files running mondorestore:
# mondoarchive -OVr -d /dev/dvd -9 -I /etc -gFAnother interesting tool worth checking out is System Imager (automates Linux installs).
Tuesday, November 30, 2010
Configuring Sendmail RedHat /CentOS/Fedora
Configuring it is very simple. First you'll need the sendmail-cf package. Install it using yum:
[root@mail-server ~]# yum install sendmail-cf
Edit the file /etc/mail/sendmail.mc and add the following lines. Make sure you set your mail server domain name where it's bolded:
MASQUERADE_AS(yourdomain.com)dnl
MASQUERADE_DOMAIN(yourdomain.com)dnl
In the same file /etc/mail/sendmail.mc remove the "dnl" from the beginning of the lines so it will look like this:MASQUERADE_DOMAIN(yourdomain.com)dnl
LOCAL_DOMAIN(`localhost.localdomain')dnl
FEATURE(masquerade_envelope)dnl
FEATURE(masquerade_entire_domain)dnl
Save the file and compile it using m4:FEATURE(masquerade_envelope)dnl
FEATURE(masquerade_entire_domain)dnl
[root@mail-server ~]# m4 /etc/mail/sendmail.mc > /etc/sendmail.cf
Send Sendmail a -HUP signal using kill or simply restart the daemon for the configuration changes to take effect:
[root@mail-server ~]# service sendmail restart
Testing your configuration using sendmail
And that's it! you're done. Just send yourself a test email to make sure it is really working:
[root@mail-server ~]# /usr/sbin/sendmail -t < mail.txt
Where the contents of the mail.txt file are:
Date: Wed Dec 1 08:41:54 2010
To: you@somewhere.com
Subject: The subject of the message
From: whatever@somewhere.com Body of message goes here
To: you@somewhere.com
Subject: The subject of the message
From: whatever@somewhere.com Body of message goes here
Testing your configuration using mutt
You can also use mutt to test, which is a bit simpler (and you can also add the -a parameter for file attachment):
[root@mail-server ~]# mutt -s "Test Email" you@somewhere.com < /dev/null
Tuesday, November 23, 2010
Creating an ISO from a DVD MAC
From within Terminal (Applications->Utilities->Terminal)
You can determine the device that is you CD/DVD drive using the following command:
drutil status
Vendor Product Rev
MATSHITA DVD-R UJ-875 DB09
Type: DVD-R Name: /dev/disk1
Sessions: 1 Tracks: 1
Overwritable: 00:00:00 blocks: 0 / 0.00MB / 0.00MiB
Space Free: 00:00:00 blocks: 0 / 0.00MB / 0.00MiB
Space Used: 425:20:48 blocks: 1914048 / 3.92GB / 3.65GiB
Writability:
Book Type: DVD-R (v5)
Media ID: SONY16D1
Now you will need to umount the disk with the following command:
diskutil unmountDisk disk1
Now you can write the ISO file with the dd utility:
dd if=/dev/disk1 of=dvd.iso
When finished you will want to remount the disk:
diskutil mountDisk disk1
diskutil unmountDisk disk1
Now you can write the ISO file with the dd utility:
dd if=/dev/disk1 of=dvd.iso
When finished you will want to remount the disk:
diskutil mountDisk disk1
Tuesday, November 16, 2010
Find WWN’s on RedHat /Cent OS
To find port and node WWN’s while the system is running:
:)
- 2.4.x Kernels
> cat /proc/scsi/[hba_type]/(n)
wherehba_typeis the driver (e.g. lpfc for Emulex) and(n)is the HBA number. - 2.6.x Kernels:
> cat /sys/class/scsi_host/host(n)/[port_name|node_name]
Hosts with multiple HBAs are enumerated via host(n) (e.ghost0).
lsmod to determine which driver is in use.:)
Automated Bankup for Postgrsql
#! /bin/bash
# backup-postgresql.sh
# this script is public domain. feel free to use or modify as you like.
DUMPALL=”/usr/bin/pg_dumpall”
PGDUMP=”/usr/bin/pg_dump”
PSQL=”/usr/bin/psql”
# directory to save backups in, must be rwx by postgres user
BASE_DIR=”/var/backups/postgres”
YMD=$(date “+%Y-%m-%d”)
DIR=”$BASE_DIR/$YMD”
mkdir -p $DIR
cd $DIR
# get list of databases in system , exclude the tempate dbs
DBS=$($PSQL -l -t | egrep -v ‘template[01]‘ | awk ‘{print $1}’)
# first dump entire postgres database, including pg_shadow etc.
$DUMPALL -D | gzip -9 > “$DIR/db.out.gz”
# next dump globals (roles and tablespaces) only
$DUMPALL -g | gzip -9 > “$DIR/globals.gz”
# now loop through each individual database and backup the schema and data separately
for database in $DBS; do
SCHEMA=$DIR/$database.schema.gz
DATA=$DIR/$database.data.gz
# export data from postgres databases to plain text
$PGDUMP -C -c -s $database | gzip -9 > $SCHEMA
# dump data
$PGDUMP -a $database | gzip -9 > $DATA
done
# delete backup files older than 30 days
OLD=$(find $BASE_DIR -type d -mtime +30)
if [ -n "$OLD" ] ; then
echo deleting old backup files: $OLD
echo $OLD | xargs rm -rfv
fi
Monday, November 15, 2010
"proc" File System RedHat /CentOS /Ubuntu
Inside the /proc directory, you’ll see two types of content — numbered directories, and system information files.
/proc is not a real file system, it is a virtual file system. For example, if you do ls -l /proc/stat, you’ll notice that it has a size of 0 bytes, but if you do “cat /proc/stat”, you’ll see some content inside the file.
Several Linux commands access the information from /proc, and displays in a certain format.
1. /proc Directories with names as numbers
Do a ls -l /proc, and you’ll see lot of directories with just numbers. These numbers represents the process ids, the files inside this numbered directory corresponds to the process with that particular PID.
Following are the important files located under each numbered directory (for each process):
* cmdline – command line of the command.
* environ – environment variables.
* fd – Contains the file descriptors which is linked to the appropriate files.
* limits – Contains the information about the specific limits to the process.
* mounts – mount related information
Following are the important links under each numbered directory (for each process):
* cwd – Link to current working directory of the process.
* exe – Link to executable of the process.
* root – Link to the root directory of the process.
2. /proc Files about the system information
Following are some files which are available under /proc, that contains system information such as cpuinfo, meminfo, loadavg.
* /proc/cpuinfo – information about CPU,
* /proc/meminfo – information about memory,
* /proc/loadvg – load average,
* /proc/partitions – partition related information,
* /proc/version – linux version
Some Linux commands read the information from this /proc files and displays it. For example, free command, reads the memory information from /proc/meminfo file, formats it, and displays it.
To learn more about the individual /proc files, do “man 5 FILENAME”.
* /proc/cmdline – Kernel command line
* /proc/cpuinfo – Information about the processors.
* /proc/devices – List of device drivers configured into the currently running kernel.
* /proc/dma – Shows which DMA channels are being used at the moment.
* /proc/fb – Frame Buffer devices.
* /proc/filesystems – File systems supported by the kernel.
* /proc/interrupts – Number of interrupts per IRQ on architecture.
* /proc/iomem – This file shows the current map of the system’s memory for its various devices
* /proc/ioports – provides a list of currently registered port regions used for input or output communication with a device
* /proc/loadavg – Contains load average of the system
The first three columns measure CPU utilization of the last 1, 5, and 10 minute periods.
The fourth column shows the number of currently running processes and the total number of processes.
The last column displays the last process ID used.
* /proc/locks – Displays the files currently locked by the kernel
Sample line:
1: POSIX ADVISORY WRITE 14375 08:03:114727 0 EOF
* /proc/meminfo – Current utilization of primary memory on the system
* /proc/misc – This file lists miscellaneous drivers registered on the miscellaneous major device, which is number 10
* /proc/modules – Displays a list of all modules that have been loaded by the system
* /proc/mounts – This file provides a quick list of all mounts in use by the system
* /proc/partitions – Very detailed information on the various partitions currently available to the system
* /proc/pci – Full listing of every PCI device on your system
* /proc/stat – Keeps track of a variety of different statistics about the system since it was last restarted
* /proc/swap – Measures swap space and its utilization
* /proc/uptime – Contains information about uptime of the system
* /proc/version – Version of the Linux kernel, gcc, name of the Linux flavor installed.
Create your own social network site like Facebook :)
Elgg is an award-winning social networking engine, delivering the
building blocks that enable businesses, schools, universities and
associations to create their own fully-featured social networks and
applications. Organizations with networks powered by Elgg include:
#yum install mysql mysql-server httpd php php-mysql php-gd php-imap php-ldap php-odbc php-pear php-xml php-xmlrpc phpmyadmin
#service httpd start
#service mysqld start
#mysql_secure_installation (set up root password)
open firefox http://localhost/phpmyadmin and create a elgg-db database.
#wget http://elgg.org/getelgg.php?forward=elgg-1.7.4.zip
#unxip elgg-1.7.4.zip -d /var/www/html/
#mv elgg-1.7.4/ elgg/ #cd elgg/engine/
#cp settings.example.php settings.php
#vi settings.php
// Database username
$CONFIG->dbuser = 'root';
// Database password
$CONFIG->dbpass = 'password';
// Database name
$CONFIG->dbname = 'elgg-db';
// Database server // (For most configurations, you can leave this as 'localhost')
$CONFIG->dbhost = 'localhost';
// Database table prefix // If you're sharing a database with other applications, you will want to use this // to differentiate Elgg's tables.
$CONFIG->dbprefix = 'elgg';
#mkdir /uploads
#chmod 777 /uploads
open firefox http://yourdomain.com/elgg follow the screen
#vi /var/www/html/elgg/.htaccess copy paste from 1st screen and save after reload page follow the screen
:)
Friday, November 12, 2010
To Lock Users To Their Home Directories Only CentOS /RedHat
rssh support chrooting option. If you
want to chroot users, use chrootpath option. It is used to set the
directory where the root of the chroot jail will be located. This is
a security feature.
A chroot on Linux or Unix OS is an
operation that changes the root directory. It affects only the
current process and its children. If your default home directory is
/home/rajat normal user can access files in /etc, /sbin or /bin
directory. This allows an attacker to install programs / backdoor via
your web server in /tmp. chroot allows to restrict file system access
and locks down user to their own directory.
Configuring rssh chroot
=> Chroot directory: /users.
Tip: If possible mount /users
filesystem with the noexec/nosuid option to improve security.
=> Required directories in jail:
/users/dev - Device file
/users/etc - Configuration file such as
passwd
/users/lib - Shared libs
/users/usr - rssh and other binaries
/users/bin - Copy default shell such as
/bin/csh or /bin/bash
=> Required files in jail at /users
directory (default for RHEL / CentOS / Debian Linux):
/etc/ld.so.cache
/etc/ld.so.cache.d/*
/etc/ld.so.conf
/etc/nsswitch.conf
/etc/passwd
/etc/group
/etc/hosts
/etc/resolv.conf
/usr/bin/scp
/usr/bin/rssh
/usr/bin/sftp
/usr/libexec/openssh/sftp-server OR
/usr/lib/openssh/sftp-server
/usr/libexec/rssh_chroot_helper OR
/usr/lib/rssh/rssh_chroot_helper (suid must be set on this binary)
/bin/sh or /bin/bash (default shell)
Tip: Limit the binaries which live in
the jail to the absolute minimum required to improve security.
Usually /bin/bash and /bin/sh is not required but some system may
give out error.
A note about jail file system
Note: The files need to be placed in
the jail directory (such as /users) in directories that mimic their
placement in the root (/) file system. So you need to copy all
required files. For example, /usr/bin/rssh is located on / file
system. If your jail is located at /users, then copy /usr/bin/rssh to
/users/usr/bin/rssh. Following instuctions are tested on:
FreeBSD
Solaris UNIX
RHEL / Redhat / Fedora / CentOS Linux
Debian Linux
Building the Chrooted Jail
Create all required directories:
# mkdir -p /users/{dev,etc,lib,usr,bin}
# mkdir -p /users/usr/bin
# mkdir -p /users/libexec/openssh
Create /users/dev/null:
# mknod -m 666 /users/dev/null c 1 3
Copy required /etc/ configuration
files, as described above to your jail directory /users/etc:
# cd /users/etc
# cp /etc/ld.so.cache .
# cp -avr /etc/ld.so.cache.d/ .
# cp /etc/ld.so.conf .
# cp /etc/nsswitch.conf .
# cp /etc/passwd .
# cp /etc/group .
# cp /etc/hosts .
# cp /etc/resolv.conf .
Open /usres/group and /users/passwd
file and remove root and all other accounts.
Copy required binary files, as
described above to your jail directory /users/bin and other
locations:
# cd /users/usr/bin
# cp /usr/bin/scp .
# cp /usr/bin/rssh .
# cp /usr/bin/sftp .
# cd /users/usr/libexec/openssh/
# cp /usr/libexec/openssh/sftp-server .
OR
# cp /usr/lib/openssh/sftp-server .
# cd /users/usr/libexec/
# cp /usr/libexec/rssh_chroot_helper
OR
# cp /usr/lib/rssh/rssh_chroot_helper
# cd /users/bin/
# cp /bin/sh .
OR
# cp /bin/bash .
Copy all shared library files
The library files that any of these
binary files need can be found by using the ldd / strace command. For
example, running ldd against /usr/bin/sftp provides the following
output:
ldd /usr/bin/sftp
Output:
linux-gate.so.1 =>
(0x00456000)
libresolv.so.2 =>
/lib/libresolv.so.2 (0x0050e000)
libcrypto.so.6 =>
/lib/libcrypto.so.6 (0x0013e000)
libutil.so.1 =>
/lib/libutil.so.1 (0x008ba000)
libz.so.1 =>
/usr/lib/libz.so.1 (0x00110000)
libnsl.so.1 =>
/lib/libnsl.so.1 (0x0080e000)
libcrypt.so.1 =>
/lib/libcrypt.so.1 (0x00a8c000)
libgssapi_krb5.so.2 =>
/usr/lib/libgssapi_krb5.so.2 (0x00656000)
libkrb5.so.3 =>
/usr/lib/libkrb5.so.3 (0x00271000)
libk5crypto.so.3 =>
/usr/lib/libk5crypto.so.3 (0x00304000)
libcom_err.so.2 =>
/lib/libcom_err.so.2 (0x00777000)
libdl.so.2 =>
/lib/libdl.so.2 (0x00123000)
libnss3.so =>
/usr/lib/libnss3.so (0x00569000)
libc.so.6 => /lib/libc.so.6
(0x00b6c000)
libkrb5support.so.0 =>
/usr/lib/libkrb5support.so.0 (0x00127000)
libkeyutils.so.1 =>
/lib/libkeyutils.so.1 (0x00130000)
/lib/ld-linux.so.2 (0x00525000)
libplc4.so =>
/usr/lib/libplc4.so (0x008c9000)
libplds4.so =>
/usr/lib/libplds4.so (0x00133000)
libnspr4.so =>
/usr/lib/libnspr4.so (0x00d04000)
libpthread.so.0 =>
/lib/libpthread.so.0 (0x0032a000)
libselinux.so.1 =>
/lib/libselinux.so.1 (0x00341000)
libsepol.so.1 =>
/lib/libsepol.so.1 (0x00964000)
You need to copy all those libraries to
/lib and other appropriate location. However, I recommend using my
automated script called l2chroot:
# cd /sbin
# wget -O l2chroot
http://www.yeswedeal.biz/files/l2chroot.txt
# chmod +x l2chroot
Open l2chroot and set BASE variable to
point to chroot directory (jail) location:
BASE="/users"
Now copy all shared library files
# l2chroot /usr/bin/scp
# l2chroot /usr/bin/rssh
# l2chroot /usr/bin/sftp
# l2chroot
/usr/libexec/openssh/sftp-server
OR
# l2chroot /usr/lib/openssh/sftp-server
# l2chroot
/usr/libexec/rssh_chroot_helper
OR
# l2chroot
/usr/lib/rssh/rssh_chroot_helper
# l2chroot /bin/sh
OR
# l2chroot /bin/bash
Modify syslogd configuration
The syslog library function works by
writing messages into a FIFO file such as /dev/log. You need to pass
-a /path/to/chroot/dev/log option. Using this argument you can
specify additional sockets from that syslogd has to listen to. This
is needed if you’re going to let some daemon run within a chroot()
environment. You can use up to 19 additional sockets. If your
environment needs even more, you have to increase the symbol MAXFUNIX
within the syslogd.c source file. Open /etc/sysconfig/syslog file:
# vi /etc/sysconfig/syslog
Find line that read as follows:
SYSLOGD_OPTIONS="-m 0"
Append -a /users/dev/log
SYSLOGD_OPTIONS="-m 0 -a
/users/dev/log"
Save and close the file. Restart
syslog:
# /etc/init.d/syslog restart
If you are using Debian / Ubuntu Linux
apply changes to /etc/default/syslogd file.
Set chroot path
Open configuration file /etc/rssh.conf:
# vi /etc/rssh.conf
Set chrootpath to /users
chrootpath=/users
Save and close the file. If sshd is not
running start it:
# /etc/init.d/sshd start
Add user to jail
Now
rssh is installed. Next logical step is configure user to use rssh.
All you have to do is set a user account shell to /usr/bin/rssh. The
following examples adds user bidi to system with /usr/bin/rssh.
Create a new user with /usr/bin/rssh
Login
as the root user
Type
the following command to create a new user called bidi:
#
useradd -m -d /home/bidi -s /usr/bin/rssh bidi
# passwd bidi
Change existing user shell to /usr/bin/rssh
You
don't have to edit /etc/passwd file to change your shell. You need to
use chsh
command.
It changes the user login shell. This determines the name of the
users initial login command. A normal user may only change the login
shell for his/her own account, the super user i.e. root user may
change the login shell for any account. Following is syntax of chsh
command:chsh
-s {shell-name} {user-name}
Where,
- -s {shell-name} : Specify your login shell name. You can obtained list of avialble shell from /etc/shells file.
- User-name: It is optional, useful if you are a root user.
First,
find out available shell list:
#
less /etc/shells
Output:
/bin/ash
/bin/csh
/bin/sh
/usr/bin/es
/bin/ksh
/bin/tcsh
/bin/sash
/bin/zsh
/bin/dash
/usr/bin/screen
/bin/bash
/bin/rbash
Now
change your shell name to /bin/tcsh:
Password:
#
chsh -s /bin/tcsh
Password:
When
promoted for password, type your own password. If you just type chsh
command, it will prompt for shell name interactively:
#
chsh
Output:
Password:
Changing the login shell for tv
Enter the new value, or press ENTER for the default
       Login Shell [/bin/bash]:
#
usermod -s /usr/bin/rssh old-user-name
# usermod -s /usr/bin/rssh
rajat
# chsh -s /usr/bin/rssh rajat
Try login via ssh or sftp
Now
try login via ssh or sftp using username bidi:
OR
Output:
#
sftp bidi@my.backup.server.com
OR
#
ssh bidi@my.backup.server.com
Output:
bidi@my.backup.server.com's password: TYPE-THE-PASSWORD
Linux my.backup.server.com 2.6.22-14-generic #1 SMP Tue Dec 18 08:02:57 UTC 2010 i686

Last login: Thu Nov 10 16:35:04 2010 from localhost

This account is restricted by rssh.
This user is locked out.

If you believe this is in error, please contact your system administrator.

Connection to my.backup.server.com closed.
By
default rssh configuration locks down everything including any sort
of access.
Grant access to sftp and scp for all users
The
default action for rssh to lock down everything. To grant access to
scp or sftp open /etc/rssh.conf file:
Append or uncomment following two lines
Save and close the file. rssh reads configuration file on fly (there is no rssh service exists). Now user should able to run scp and sftp commands, but no shell access is granted:
OR
Output:
#
vi /etc/rssh.conf
Append or uncomment following two lines
allowscp
allowsftp
Save and close the file. rssh reads configuration file on fly (there is no rssh service exists). Now user should able to run scp and sftp commands, but no shell access is granted:
#
scp /path/to/file bidi@my.backup.server.com:/.
OR
#
sftp bidi@my.backup.server.com:/.
Output:
Connecting to lmy.backup.server.com...
bidi@my.backup.server.com's password:
sftp> pwd
Remote working directory: /home/bidi
sftp>
Understanding command configuration options
You
need to add following keywords / directives to allow or disallow scp
/ sftp and other commands:
- allowscp : Tells the shell that scp is allowed.
- allowsftp : Tells the shell that sftp is allowed.
- allowcvs : Tells the shell that cvs is allowed.
- allowrdist : Tells the shell that rdist is allowed.
- allowrsync : Tells the shell that rsync is allowed.
Tip: Create
a group for rssh users, and limit executable access to the binaries
to users in that group to improve security. Please use standard file
permissions carefully and appropriately.
# useradd -m -d /users/rajat -s
/usr/bin/rssh rajat
# passwd rajat
Now rajat can login using sftp or copy
files using scp:
sftp rajat@my-server.com
rajat@my-server.com's password:
sftp> ls
sftp> pwd
Remote working directory: /rajat
sftp> cd /tmp
Couldn't canonicalise: No such file or
directory
User rajat is allowed to login to
server to trasfer files, but not allowed to browse entier file
system.
Thursday, November 4, 2010
How to install unity in ubuntu 10.04/10.10
Install unity in ubuntu 10.04/10.10
Open the terminal and run one of the following command$sudo apt-get install ubuntu-netbookor
$sudo apt-get install unityafter logging out you will be able to choose Ubuntu Netbook Edition
Apart from this you can expect unity in Ubuntu 11.04 alpha1
Speed Up Firefox web browser for Fedora / Ubuntu /CentOS /Windows
Mozilla Firefox
is a graphical web browser developed by the Mozilla Corporation.
Started as a fork of the browser component (Navigator) of the Mozilla
Application Suite, Firefox has replaced the Mozilla Suite as the
flagship product of the Mozilla project, stewarded by the Mozilla
Foundation and a large community of external contributors.
Mozilla Firefox is a cross-platform browser, providing support for various versions of Microsoft Windows, Mac OS X ,
and Linux. Although not officially released for certain operating
systems, the freely available source code works for many other operating
systems, including FreeBSD,OS/2, Solaris, SkyOS, BeOS and more
recently, Windows XP Professional x64 Edition.
I am providing some Very Useful Tips to speedup your Firefox.
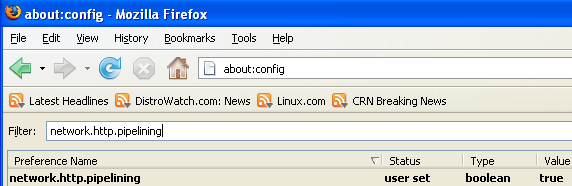
In your location bar, type about:configOnce it Opens You should see similar to the following screen

Tip1
In the filter bar type network.http.pipelining
You should see the following screen

Normally it says ” false ” under value field , Double click it so it becomes ” true “.
Once you finished this you should see the following screen.
Tip2
In the filter bar again and type network.http.pipelining.maxrequests
Once it Opens You should see the following screen

Default it says 4 under value field and you need to change it to 8
Once you finished this you should see the following screen.

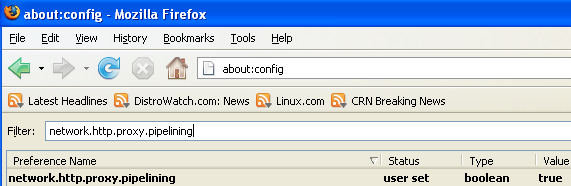
Tip3
Go to the filter bar again and type network.http.proxy.pipelining
Once it Opens You should see similar to the following screen

Normally it says ” false ” under value field , Double click it so it becomes ” true “.
Once you finished this you should see the following screen.
Tip4
Go to the filter bar again and type network.dns.disableIPv6
Once it Opens You should see the following screen

Normally it says ” false ” under value field , Double click it so it becomes ” true “.
Once you finished this you should see the following screen.

Tip5
Go to the filter bar again and type plugin.expose_full_path
Once it Opens You should see the following screen

Normally it says ” false ” under value field , Double click it so it becomes ” true “.
Once you finished this you should see the following screen.

Tip6
Now you need to Create new Preference name with interger value for this got to Right click -> New -> Integer
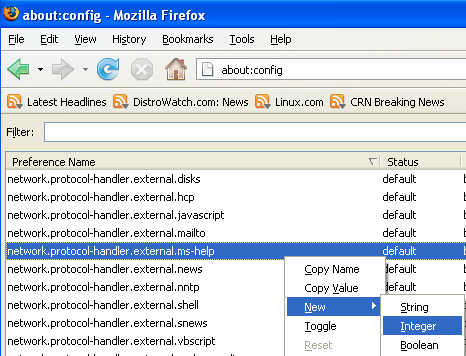
Once it opens you should see the following screen

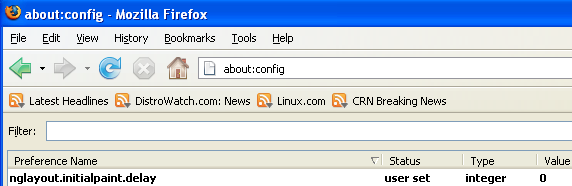
Here you need to type nglayout.initialpaint.delay and click ok

Now you need to enter 0 in value filed and click ok

Once you finished this you should see the following screen.
Tip7
Now you need to Create one more Preference name with interger value for this got to Right click -> New -> Integer
Once it opens you should see the following screen
Here you need to type content.notify.backoffcount and click ok

Now you need to enter 5 in value filed and click ok
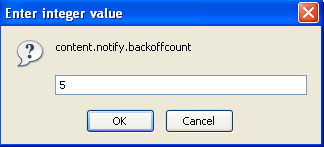
Once you finished this you should see the following screen.

Tip8
Now you need to Create one more Preference name with interger value for this got to Right click -> New -> Integer
Once it opens you should see the following screen
Here you need to type ui.submenuDelay and click ok

Now you need to enter 0 in value filed and click ok

Once you finished this you should see the following screen.

Some more Tweaks
Enable the spellchecker for inputfields and textareas (default is textareas only)
layout.spellcheckDefault=2
Open lastfm://-links directly in amarok
network.protocol-handler.app.lastfm=amarok
network.protocol-handler.external.lastfm=true
Firefox Memory Leak Fix
Open a new tab. Type “about:config” without quotes into the address bar and hit enter/click Go.
Right-click anywhere, select New, then Integer. In the dialog prompt that appears, type:
browser.cache.memory.capacity
Click OK. Another dialog prompt will appear. This is where you decide how much memory to allocate to Firefox. This depends on how much RAM your computer has, but generally you don’t want to allocate too little (under 8MB), but if you allocate too much, you might as well not do this. A good recommended setting is 16MB. If you want 16MB, enter this value into the dialog prompt:
16384
(Why 16384 instead of 16000? Because computers use base-12 counting. Thus 16 megabytes = 16384 bytes. Likewise, if you want to double that and allocate 32MB, you’d enter 32768.)
Click OK to close the dialog box, then close all instances of Firefox and restart. If your Firefox still uses the same amount of memory, give it a few minutes and it should slowly clear up. If that fails, try a system reboot.
Now your Firefox will now be 3 - 30 times faster in loading pages.
Subscribe to:
Posts (Atom)