Thursday, December 29, 2011

Cluster How to CentOS / RedHat 6.2

Step # 1: Mount an ISO file.

# mkdir -p /media/centos
# mount -o loop /dev/centos6X.iso /media/centos

Step # 2: Create repo config file on both the node.

# vi /etc/yum.repos.d/iso.repo
[ISO]
baseurl=file:///media/centos
enabled=1

Save and close the file

Step # 3: Stop firewall on both node.

#chkconfig iptables off
#chkconfig ip6tables off

Step # 4: Disable Selinux.

#vi /etc/selinux/config
disbale selinux

reboot (if you want)

Step # 5: Add hosts entery on both node.

#vi /etc/hosts
192.168.1.10 node1.clustering.com
192.168.1.11 node2.clustering.com (add this entery to both the node)

Step # 6: Create a ricci user & passwd.

#useradd ricci
#passwd ricci

Step # 7: Install Cluster software.

#yum install cman rgmanager luci ricci (on 1st node)
#yum install cman rgmanager ricci

Step # 8: Start service on both node

#service ricci start (on both the node)

Shutting down ricci:
Starting oddjobd:                                          [  OK  ]
generating SSL certificates...  done
Generating NSS database...  done
Starting ricci:                                            [  OK  ]

#service luci start (on 1st node only)
service luci restart
Stop luci...                                               [  OK  ]
Start luci...                                              [  OK  ]
Point your web browser to https://centos1.clsutering.com:8084 (or equivalent) to access luci

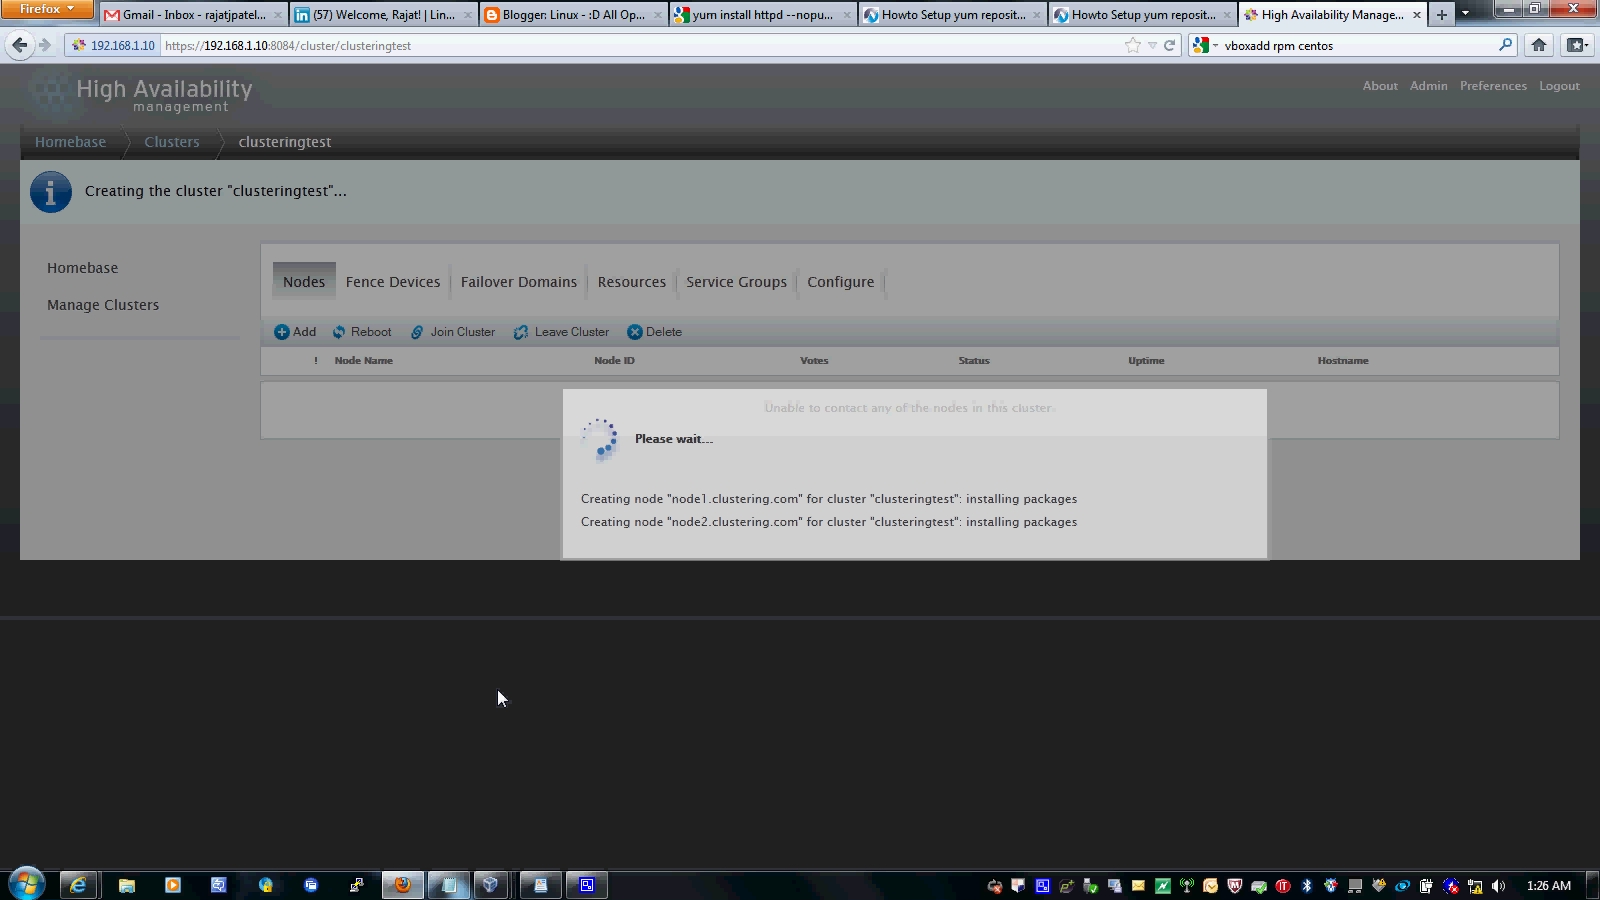
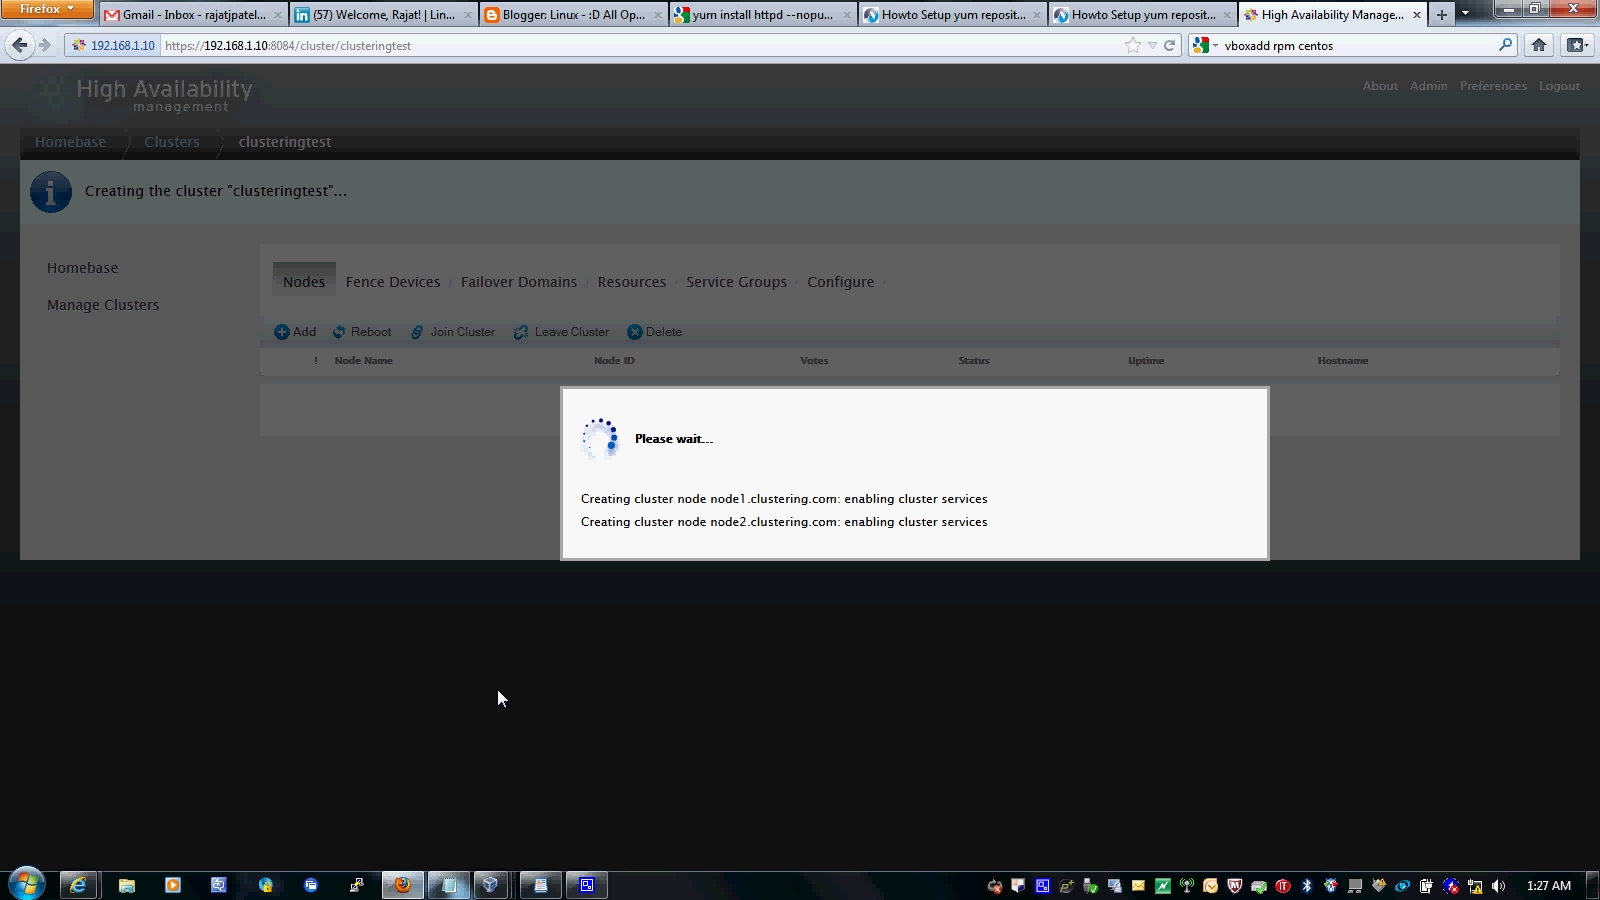
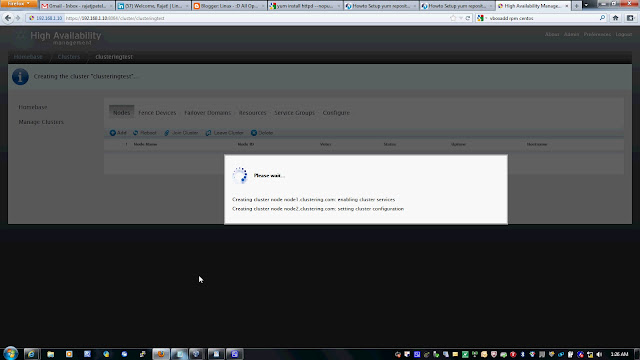
Step # 9: Open the firefox.

https://192.168.1.10:8084/

login as root & root passwd

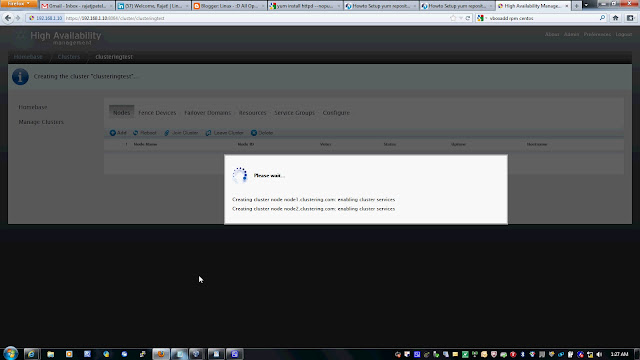
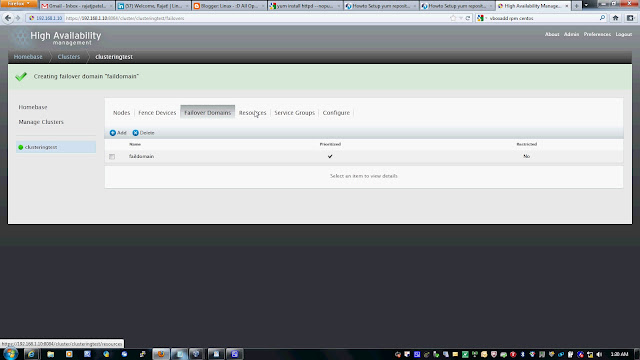
Follow the snap short or you watch youtube to create a Cluster on following link


Friday, December 23, 2011

RedHat / CentOS Cluster, Which ports need to be open within iptables

cman (Cluster Manager) UDP Ports 5404, 5405

# iptables -I INPUT -m state --state NEW -m multiport -p udp -s 192.168.1.0/24 -d 192.168.1.0/24 --dports 5404,5405 -j ACCEPT

# iptables -I INPUT -m addrtype --dst-type MULTICAST -m state --state NEW -m multiport -p udp -s 192.168.1.0/24 --dports

 dlm (Distributed Lock Manager) TCP Port 21064

# iptables -I INPUT -m state --state NEW -p tcp -s 192.168.1.0/24 -d 192.168.1.0/24 --dport 21064 -j ACCEPT

 ricci (part of Conga remote agent) TCP Port 11111

# iptables -I INPUT -m state --state NEW -p tcp -s 192.168.1.0/24 -d 192.168.1.0/24 --dport 11111 -j ACCEPT

 modclusterd (part of Conga remote agent) TCP Port 16851

# iptables -I INPUT -m state --state NEW -p tcp -s 192.168.1.0/24 -d 192.168.1.0/24 --dport 16851 -j ACCEPT

 luci (Conga User Interface server) TCP Port 8084

# iptables -I INPUT -m state --state NEW -p tcp -s 192.168.1.0/24 -d 192.168.1.0/24 --dport 8084 -j ACCEPT

 igmp (Internet Group Management Protocol)

# iptables -I INPUT -p igmp -j ACCEPT

Tuesday, December 20, 2011

Linux LVM

1. create LVM partition:

fdisk /dev/[disk]
change partition type from LINUX to LVM

2. initialization LVM partition:
pvcreate /dev/[disk_partiton1] /dev/[disk_partition2]
check commands:
pvs
pvdisplay

3. create LVM group:
vgcreate [group_name] /dev/[disk_partition1] /dev/[disk_partition2]
check commands:
vgs
vgdisplay

4. create logical volumes which is attached to group:
lvcreate -L[size]M -n [vol_name] [group_name]
check commands:
lvs
lvdisplay

5. format volumes:
mkfs.ext3 [LV_name_from_lvdisplay]


EXTEND
change size volume:
lvextend -L +[size]M [LV_name_from_lvdisplay]

change size partition:
resize2fs [LV_name_from_lvdisplay]

REDUCE
fsck -f [LV_name_from_lvdisplay]

change size partition:
resize2fs [LV_name_from_lvdisplay] [size]G

change size volume:
lvreduce -L -[size]G [LV_name_from_lvdisplay]

Force User to Change Password at First Login Fedora /Centos /Suse /Ubuntu

To setup this there are various ways, but I believe one of the very simplest one is the one I am going to explain below.
For ex: You created a new user “fake”:
# useradd fake

Create password for the user
# passwd fake
Changing password for user foo.
New UNIX password:
BAD PASSWORD: it is WAY too short
Retype new UNIX password:
Then to force the user to change the password at the first login, simply set the password to expiry:
#chage -d 0 foo

This command will set the password to expiry and will force user to change their password at the next login.

Setting it default for all new Users:

A system admin is one which who can do the work but a efficient system admin is the one who do the work manually first time and then make computer to work for him next time for same task. Same thing is true over here. You want all the new users added to your system, to be forced to change their password at the first login, update this file
#vi /etc/default/useradd
 GROUP=100
HOME=/home
INACTIVE=-1
EXPIRE=0 #(need to add zero "0")
SHELL=/bin/bash
SKEL=/etc/skel
GROUPS=video
CREATE_MAIL_SPOOL=no
UMASK=022
This file contains the details, what all settings will be applied to the new users created into the system with useradd command.
Just set the value of EXPIRE=0 in this file, and after that, every time when a new user will be created, they will be forced to change the password at the next login.

password duration:
for new accounts default settings are in /etc/login.defs
settings for current accounts are in /etc/shadow but we edit by command chage
chage -l [user] #check settings for user
chage -E "YYYY-MM-DD" [user] #set date when account expire, -1 means never
chage -M [nr] [user] #set maximum number of days between password change from last password change, -1 means never expire
chage -d "YYYY-MM-DD" [user] #set last password change
chage -W [nr] [user] #number of days of warning before password expires
chage -i [nr] [user] #set password inactive, when account is blocked after password expire

Friday, November 18, 2011

RedHat / CentOS 6 Bonding

Bonding

Bonding (also known as “Ethernet bonding”) is a computer networking arrangement in which two or more network interfaces on a host computer are combined for redundancy or increased throughput.
mode=0 (Balance-rr) – This mode provides load balancing and fault tolerance.
mode=1 (active-backup) – This mode provides fault tolerance.
mode=2 (balance-xor) – This mode provides load balancing and fault tolerance.
mode=3 (broadcast) – This mode provides fault tolerance.
mode=4 (802.3ad) – This mode provides load balancing and fault tolerance.
mode=5 (balance-tlb) – Prerequisite: Ethtool support in the base drivers for retrieving the speed of each slave.
mode=6 (Balance-alb) – Prerequisite: Ethtool support in the base drivers for retrieving the speed of each slave.

Note: Always append extra configuration in case of a rollback.

Configuring  Bonding

# cd /etc/sysconfig/network-scripts/
# vi ifcfg-bond0
1
2
3
4
5
6
7
8
9
10
DEVICE=bond0
USERCTL=no
BOOTPROTO=none
ONBOOT=yes
IPADDR=10.0.0.10
NETMASK=255.255.0.0
NETWORK=10.0.0.0
 
TYPE=Unknown
IPV6INIT=no
# vi ifcfg-eth0
1
2
3
4
5
6
DEVICE=eth0
BOOTPROTO=none
ONBOOT=yes
MASTER=bond0
SLAVE=yes
USERCTL=no
# vi ifcfg-eth1
1
2
3
4
5
6
DEVICE=eth1
BOOTPROTO=none
ONBOOT=yes
MASTER=bond0
SLAVE=yes
USERCTL=no
# vi ifcfg-eth2
1
2
3
4
5
6
DEVICE=eth2
BOOTPROTO=none
ONBOOT=yes
MASTER=bond0
SLAVE=yes
USERCTL=no
Due to the fact that /etc/modprobe.conf has been deprecated in RedHat / CentOS 6, the process of bonding network interfaces has changed a bit.
Now instead of defining your bond in your /etc/modprobe.conf, you define it in /etc/modprobe.d/bonding.conf
# vi /etc/modprobe.d/bonding.conf
We’ll be using mode=6 (Balance-alb)
Append the following onto the end out your modprobe config file
1
2
alias bond0 bonding
options bond0 mode=6 miimon=100
# servive network restart

Monday, October 17, 2011

P2P P2V V2V V2P or Clone RedHat /CentOS /Fedora /Ubuntu

Using dd Clone Server or P2P P2V V2V V2P

 Exactly same hardware.
 Different hardware.
 Virtual  Machian

In my case 2 HP ProLiant DL385, one server is year old and seen come to DC is it on from there we have clone using following.

HP ProLiant DL385 = studyhat.com which is in live for production.
HP ProLiant DL385 = new brought to DC we want to create clone of studyhat.com
We have created on XEN virtualization one clone of HP ProLiant DL385  

* Boot with Live CD's new server where you want clone.
* Give IP Address to eth0 .
* Ping to the server from where you want to clone.
dd if=/dev/sda | ssh root@ipaddress "dd of=/dev/sdb"
* ssh <ipaddress of running server> 'dd if=/dev/sda' | dd of=/dev/sda
* ssh <ipaddress of running server> 'dd if=/dev/sdb' | dd of=/dev/sdb 
* # dd if=/dev/sda | ssh root@xxx.xxx.xxx.xxx (target ip address )'dd of=/dev/sda'
*#dd if=/dev/sda |gzip -c --fast| ssh root@target ip address 'gzip -d | dd of=/dev/sda'
* Once you get # <console> 
* #vi /etc/sysconfig/network
* #vi /etc/hosts /
* #vi /etc/sysconfig/network-scripts/ifcfg-bond0
*  #vi /etc/sysconfig/network-scripts/ifcfg-eth0
*    * #vi /etc/resolv.conf
*    * # reboot


Tuesday, September 27, 2011

Linux Directory Structure

/bin - This directory contains most of your non-privileged system commands such as ls, mkdir, rm, etc.
/boot - Contains the systems boot image, bootloader, and the kernel
/dev - Symbolic links to system devices such as optical and removable drives
/etc - Contains all system configuration files and most configurations for installed packages
/home - Contains a directory for each user and contains profile information
/lib - Contains dynamic libraries and modules for the Linux system and installed packages
/media - Contains mount points for optical drives and removable media
/mnt - Used as a location for mounted drives and shares
/opt - Contains user installed packages and custom software not handled by the system or package manager
/proc - An interface between the kernel and the system, useful for diagnostics and system information
/root - The root superuser's home directory
/sbin - Contains privileged commands that are usually run as superuser (root/sudo)
/sys - An interface between the kernel and the system, used for modifying system settings
/tmp - A location for temporary files such as sessions on a web server
/usr - Contains most installed packages that are not part of the system, user installed programs
/usr/bin - Contains commands related to user installed packages in /usr
/usr/sbin - Contains privileged commands related to user installed packages in /usr
/var - Contains files that change often or accessed frequently
/var/log - Contains all system logs and most logs generated by installed packages

Sunday, September 18, 2011

Linux NAT

If you are running a recent 2.6 Linux Kernel this four step process should work for you. This has been specifically tested on Fedora Core 3, 4, 5, and 6, but should work on any modern Linux distribution. All of these commands must be executed as the root user. First you need to tell your kernel that you want to allow IP forwarding.
echo 1 > /proc/sys/net/ipv4/ip_forward
Then you'll need to configure iptables to forward the packets from your internal network, on /dev/eth1, to your external network on /dev/eth0. You do this will the following commands:
/sbin/iptables -t nat -A POSTROUTING -o eth0 -j MASQUERADE
/sbin/iptables -A FORWARD -i eth0 -o eth1 -m state --state RELATED,ESTABLISHED -j ACCEPT
/sbin/iptables -A FORWARD -i eth1 -o eth0 -j ACCEPT
You should now be NATing. You can test this by pinging an external address from one of your internal hosts. The last step is to ensure that this setup survives over a reboot. Obviously you should only do these last two steps if your test is a success.

Search Engine Installation and Configaration

Introduction
htdig is a webpage search engine licensed under the GNU Public License. It uses a very simple configuration file to allow it to search only the webpages you specify. For example, you can exclude the cgi-bin or a testing directory from the search engine. In addition to installing it on a webserver, some programs use it as a search engine plugin such as Glade, the GTK+ User Interface Builder. In addition, it will create a searchable database of any website. You just supply to URL.
Installing htdig
  1. Download the latest version from the htdig ftp server.
  2. tar -xvfz htdig-3.1.5.tar.gz
  3. cd htdig-3.1.5
  4. ./configure
  5. make
  6. make install

Configuring htdig

Once you have htdig installed, you must make a few changes to the configuration file and the HTML templates into which the search results are embedded.

Configuration File

The configuration file for htdig is located at /opt/www/htdig/conf/htdig.conf. It is pretty self-explanitory. The main attributes you need to configure are as follows. It will work if you leave the defaults for the other options or change them if you wish.
Attribute Value Example
start_url URL of your site http://www.mywebsite.com
exclude_urls Directories you do not want searched separated by white spaces /cgi-bin/ /testing/
adminstrator Email address of administrator admin@mywebsite.com
search_results_header HTML file to be used as header of search results. Only use this if you don’t want to use the default location for the header file: /opt/www/htdig/common/header.html /home/httpd/search/header.html
search_results_footer HTML file to be used as footer of search results. Only use this if you don’t want to use the default location for the header file: /opt/www/htdig/common/footer.html /home/httpd/search/footer.html
nothing_found_file HTML file to be displayed if there is no match to search string entered. Only use this if you don’t want to use the default location for the header file: /opt/www/htdig/common/nomatch.html /home/httpd/search/nomatch.html
syntax_error_file HTML file to be displayed if there is a syntax error in the search string entered. Only use this if you don’t want to use the default location for the header file: /opt/www/htdig/common/syntax.html /home/httpd/search/syntax.html
HTML Templates

If you don’t want to use the default look-and-feel of htdig, you can edit the following files to use the look-and-feel of your website. The paths may be different if you choose to change the paths of them in your configuration file.
  • /opt/www/htdig/common/header.html
  • /opt/www/htdig/common/footer.html
  • /opt/www/htdig/common/nomatch.html
  • /opt/www/htdig/common/syntax.html
Post-installation and configuration
  1. Next, you must setup the search database by running the script /opt/www/htdig/bin/rundig.
  2. Copy the default search.html and images from /opt/www/htdocs/htdig to a directory named htdig off of your webRoot. If the images are not in this directory, they will not appear unless you configure it otherwise it htdig.conf.
  3. Copy /opt/www/cgi-bin/htsearch to the cgi-bin for your webserver.
  4. Test the search engine by opening search.html in your browser and entering a search string.
  5. Because the search engine uses a database to return results, the database must be rebuilt with the rundig command used in step 1 every time any pages are added to the website.
  6. If you want to configure anything else, refer the the htdig website. Pretty much everything is configurable with htdig.

Wednesday, September 14, 2011

Monitor ALL eth0 Traffic Except My Own SSH Session tcpdump:

I'm using tcpdump to dump, debug and monitor traffic on a network. However, there is lots of noise and I would like to exclude ssh from my dumps. How do I monitor all traffic except my ssh session?

The tcpdump command displays out the headers of packets on a network interface that match the boolean expression. In other words you can use boolean expression to drop ssh traffic from dumping and monitoring operation using the following syntax:
tcpdump -i eth0  -s 1500 port not 22
You can skip additional ports too:
tcpdump -i eth0  -s 1500 port not 22 and port not 53
You can also use ip or hostname:
tcpdump -i eth0 port not 22 and host 1.2.3.4

See also:

man tcpdump

Wednesday, August 17, 2011

Linux password policy

Linux password lockout policy can be configured using PAM "Pluggable Authentication Modules" to lock a user’s account temporarily if they attempt to bruteforce into an account by trying various password combinations. This configuration uses the pam_tally2.so module. Bruteforce hacking is a method to find a user’s password by trying to login with various password combinations. By having a password lockout policy such users can be locked out of their account if a certain number of incorrect passwords are entered. While trying this tutorial in your system make sure you have the file /lib/security/pam_tally2.so if it isn’t there trying this out will lock all user accounts even if you enter the correct password.
Using a text editor open the following file
/etc/pam.d/system-auth
add the following text to the second line.
auth required pam_tall2.so deny=3 unlock_time=3600
The above statement will lock an user account if incorrect passwords are entered three or more times as specified in the deny option. The account will be unlocked after 3600 seconds as specified in the unlock_time option. Choose the number of incorrect attempts and unlock time wisely. There is also another option which will enforce this policy for the root user.
auth required pam_tall2.so deny=3 unlock_time=3600 even_deny_root
The even_deny_root will lockout the root user also. So use this option with caution. After this is done add another line in the account section in the same file
account required pam_tally2.so
Save the /etc/pam.d/system-auth file, before testing your configuration open another terminal and try to login as any user with a CORRECT password, if you’re unable to login at this stage there is something wrong with the /etc/pam.d/system-auth file. If you’re able to login successfully try by logging in using the correct username and wrong password. Each time you try execute the following command as root to find the number of authentication failure attempts.
pam_tally2
or
pam_tally2 -u username
to see information regarding a specific user (Replace username with the actual user).
If you enter the incorrect password for certain number of times the following message will appear as soon as the username is entered
Account locked due to 4 failed login attempts
To manually unlock the account before the unlock_time use the following command
pam_tally2 -u username -r
A more conservative usage of the above command is to deduct the number of times the user has logged in unsuccessfully. For example, if the password retries is 3 and user Alice has tried logging in with an incorrect password 4 times, using the above command to unlock the account will give another 3 tries for the username Alice which might give more attempts for a potential hacker. Instead the incorrect attempts counter value can be set to 2 so that Alice has just one more attempt.
pam_tally2 -u username --reset=2
will set the incorrect password counter for the user to 2.
In case the root user is locked out and you immediately need to login as root, boot your system into single user mode and execute the following command.
pam_tally2 -u root -r

Monday, May 9, 2011

Disable the fsck on boot

  1. Boot the system from boot disc 1 or an ISO image of the installation media
  2. Once the system has successfully booted from the ISO image and the Red Hat Enterprise Linux boot screen will appears, type: "linux rescue" without the quotes, and hit enter at the prompt.
  3. Select "Continue" when prompted to allow the rescue environment to mount Red Hat Enterprise Linux installation under /mnt/sysimage directory.
  4. Type "chroot /mnt/sysimage"
  5. Then edit /etc/fstab
  6. In this file, in the very last column for each mount point, there is a number.  Changing this number to a 0 (zero) will make it so that it does not try to fsck that mount point on boot.
  7. Save the file
  8. Reboot or CTRL+D

Saturday, April 2, 2011

Set Up A Feng Office Suite Web Server Fedora /Centos / RedHat

Feng Office allows businesses to manage project tasks, billing, documents, communication with co-workers, customers and vendors, schedule meetings and events, and share every kind of electronic information.

#yum install  mysql mysql-server httpd php php-mysql php-gd php-imap php-ldap php-odbc php-pear php-xml php-xmlrpc phpmyadmin

#service httpd start
#service mysqld start
#mysql_secure_installation (set up root password)
#wget http://downloads.sourceforge.net/project/opengoo/fengoffice/fengoffice_1.7.4/fengoffice_1.7.4.zip
#unzip fengoffice_1.7.4.zip -d /var/www/html/

Open Firefox http://localhost/feng_community


[root@rajat feng_community]# chmod 777 config/
[root@rajat feng_community]# chmod 777 cache/
[root@rajat feng_community]# chmod 777 upload/
[root@rajat feng_community]# chmod 777 tmp/


your Office online have fun


Sunday, March 27, 2011

How to Rollback Package Updates/Installation on Fedora /RedHat/ CentOS

Fedora 14, like FC14, uses yum for package management. yum is built on top of rpm, and pirut, pup, and yumex are graphical interfaces built on top of yum. Together, these tools provide a simple-to-use, powerful package management system.

One of the least-known secrets about rpm is that it can rollback (undo) package changes. It can take a fair bit of storage space to track the information necessary for rollback, but since storage is cheap, it's worthwhile enabling this feature on most systems.

Here's cut-to-the-chase directions on using this feature:

  1. To configure yum to save rollback information, add the line tsflags=repackage to /etc/yum.conf.

  2. To configure command-line rpm to do the same thing, add the line %_repackage_all_erasures 1 to /etc/rpm/macros.

  3. Install, erase, and update packages to your heart's content, using pup, pirut, yumex, yum, rpm, and the yum automatic update service.

  4. If/when you want to rollback to a previous state, perform an rpm update with the --rollback option followed by a date/time specifier. Some examples: rpm -Uhv --rollback '3:00 pm', rpm -Uhv --rollback '4 hours ago', rpm -Uhv --rollback 'March 25'.

Friday, March 25, 2011

Top Command Linux


When you need to see the running processes on your Linux in real time, you have top as your tool for that.
top also displays other info besides the running processes, like free memory both physical and swap
Usage
top [options]
Options
-d ss.tt
Delay -- Specifies the seconds and tenths of seconds of delay between the updates of the info showed on the screen, being the default 3 seconds
-i
Starts top with the last remembered 'i' state reversed. When this toggle is Off, tasks that are idled or zombied will not be displayed.
-n n
Specifies the maximum number of iterations, or frames, top should produce before ending.
-p n
Monitor only processes with specified process IDs. This option can be given up to 20 times, or you can provide a comma delimited list with up to 20 pids. Co-mingling both approaches is permitted. This is a command-line option only. And should you wish to return to normal operation, it is not necessary to quit and and restart top -- just issue the '=' interactive command.
-s
- Secure - Runs top in secure mode, restricting the commands you can use while top is running even for root
-S (Sum)
Starts top with the last remembered 'S' state reversed. When 'Cumulative mode' is On, each process is listed with the cpu time that it and its dead children have used. See the 'S' interactive command for additional information regarding this mode.
Description of the fields
a: PID -- Process Id
The task's unique process ID, which periodically wraps, though never restarting at zero.
b: PPID -- Parent Process Pid
The process ID of a task's parent.
c: RUSER -- Real User Name
The real user name of the task's owner.
d: UID -- User Id
The effective user ID of the task's owner.
e: USER -- User Name
The effective user name of the task's owner.
f: GROUP -- Group Name
The effective group name of the task's owner.
g: TTY -- Controlling Tty
The name of the controlling terminal. This is usually the device (serial port, pty, etc.) from which the process was started, and which it uses for input or output. However, a task need not be associated with a terminal, in which case you'll see '?' displayed.
h: PR -- Priority
The priority of the task.
i: NI -- Nice value
The nice value of the task. A negative nice value means higher priority, whereas a positive nice value means lower priority. Zero in this field simply means priority will not be adjusted in determining a task's dispatchability./dd>
j: P -- Last used CPU (SMP)
A number representing the last used processor. In a true SMP environment this will likely change frequently since the kernel intentionally uses weak affinity. Also, the very act of running top may break this weak affinity and cause more processes to change CPUs more often (because of the extra demand for cpu time).
k: %CPU -- CPU usage
The task's share of the elapsed CPU time since the last screen update, expressed as a percentage of total CPU time. In a true SMP environment, if 'Irix mode' is Off, top will operate in 'Solaris mode' where a task's cpu usage will be divided by the total number of CPUs. You toggle 'Irix/Solaris' modes with the 'I' interactive command.
l: TIME -- CPU Time
Total CPU time the task has used since it started. When 'Cumulative mode' is On, each process is listed with the cpu time that it and its dead children has used. You toggle 'Cumulative mode' with 'S', which is a command-line option and an interactive command. See the 'S' interactive command for additional information regarding this mode.
m: TIME+ -- CPU Time, hundredths
The same as 'TIME', but reflecting more granularity through hundredths of a second.
n: %MEM -- Memory usage (RES)
A task's currently used share of available physical memory.
o: VIRT -- Virtual Image (kb)
The total amount of virtual memory used by the task. It includes all code, data and shared libraries plus pages that have been swapped out.
VIRT = SWAP + RES.
p: SWAP -- Swapped size (kb)
The swapped out portion of a task's total virtual memory image.
q: RES -- Resident size (kb)
The non-swapped physical memory a task has used.
RES = CODE + DATA.
r: CODE -- Code size (kb)
The amount of physical memory devoted to executable code, also known as the 'text resident set' size or TRS.
s: DATA -- Data+Stack size (kb)
The amount of physical memory devoted to other than executable code, also known as the 'data resident set' size or DRS.
t: SHR -- Shared Mem size (kb)
The amount of shared memory used by a task. It simply reflects memory that could be potentially shared with other processes.
u: nFLT -- Page Fault count
The number of major page faults that have occurred for a task. A page fault occurs when a process attempts to read from or write to a virtual page that is not currently present in its address space. A major page fault is when disk access is involved in making that page available.
v: nDRT -- Dirty Pages count
The number of pages that have been modified since they were last written to disk. Dirty pages must be written to disk before the corresponding physical memory location can be used for some other virtual page.
w: S -- Process Status
The status of the task which can be one of:
'D' = uninterruptible sleep
'R' = running
'S' = sleeping
'T' = traced or stopped
'Z' = zombie
Tasks shown as running should be more properly thought of as 'ready to run' -- their task_struct is simply represented on the Linux run-queue. Even without a true SMP machine, you may see numerous tasks in this state depending on top's delay interval and nice value.
x: Command -- Command line or Program name
Display the command line used to start a task or the name of the associated program. You toggle between command line and name with 'c', which is both a command-line option and an interactive command.
When you've chosen to display command lines, processes without a command line (like kernel threads) will be shown with only the program name in parentheses, as in this example:
( mdrecoveryd )
Either form of display is subject to potential truncation if it's too long to fit in this field's current width. That width depends upon other fields selected, their order and the current screen width.
Note: The 'Command' field/column is unique, in that it is not fixed-width. When displayed, this column will be allocated all remaining screen width (up to the maximum 512 characters) to provide for the potential growth of program names into command lines.
y: WCHAN -- Sleeping in Function
Depending on the availability of the kernel link map ('System.map'), this field will show the name or the address of the kernel function in which the task is currently sleeping. Running tasks will display a dash ('-') in this column.
Note: By displaying this field, top's own working set will be
increased by over 700Kb. Your only means of reducing that overhead
will be to stop and restart top.
z: Flags -- Task Flags
This column represents the task's current scheduling flags which are expressed in hexadecimal notation and with zeros suppressed. These flags are officially documented in . Less formal documentation can also be found on the 'Fields select' and 'Order fields' screens.
Interactive commands
While top is running you may issue some options that will interact immediately with top these options are:
h
Help, displays a summary of command that will modify the behavior of top
k
Kills a process, you will be able to kill only your own processes, unless you are running top as root
n
Once this command is entered top will ask you how many lines you want on your screen, if you enter 0 top will display as much as it can
q
Exits top
r
Change the priority of a process, as well as with k you will only be able to act on your own processes unless you are root
W
Writes the current configuration to your personal configuration file, which is $HOME/.toprc